Class Tutorial 07 : Touch and Camera
Overview
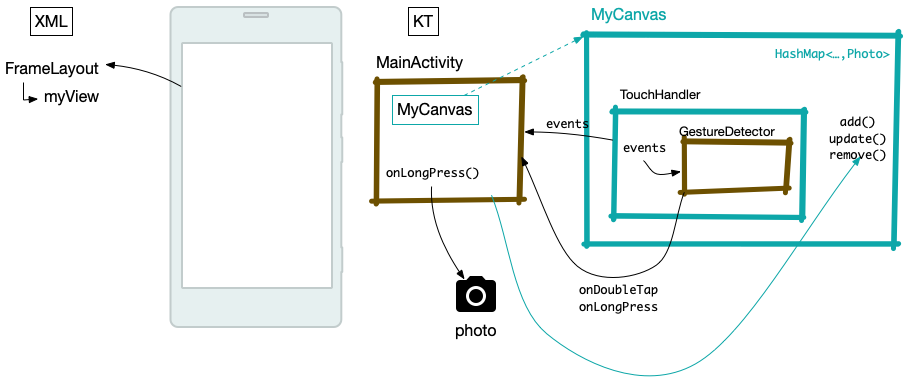
In this tutorial we will create a simple app that lets us draw on top of pictures. This class diagram shows how the components will interact:
Step 0
Create a new project. Use the empty activity template. (choose API 27: Android 8.1 (Oreo) in the dialog) and make sure to add the following to manifest XML file.
NOTE: There are references to edu.vt.cs3714.tutorial07 throughout this tutorial. They must be updated to match your project’s signature. Your project signature is shown in the app-level build.gradle as the namespace parameter.
- Add this above the
applicationtag in the manifest.
<!--
Lets declare we will be using the camera, and ask for write
permissions for the file access. Ignore the deprecation message
android studio generates
-->
<uses-feature android:name="android.hardware.camera"
    android:required="true" />

<uses-permission android:name="android.permission.WRITE_EXTERNAL_STORAGE" />
- Add this
providersection above the closingapplicationtag in the manifest. The provider declares that the app plans to use some kind of content from the system. In this case, we are going to use a FileProvider to get photo data from the apps file storage area.
<!--
Here we are indicating where we plan to store any images the camera takes
-->
<provider
    android:name="androidx.core.content.FileProvider"
    android:authorities="edu.vt.cs3714.tutorial07.fileprovider"
    android:exported="false"
    android:grantUriPermissions="true">
    <meta-data
        android:name="android.support.FILE_PROVIDER_PATHS"
        android:resource="@xml/provider_paths"></meta-data>
</provider>
Step 1
Now, we need to tell the app what “provider_paths” we plan to use. These are the paths in the devices filesystem we want to use to hold our picture files. You will need to add an XML resource in /res/xml/ called provider_paths.xml in order to allow the app to take high res photos:
<?xml version="1.0" encoding="utf-8"?>
<paths xmlns:android="http://schemas.android.com/apk/res/android">
   <external-path name="my_images" path="Android/data/edu.vt.cs3714.tutorial07/files/Pictures" />
</paths>
Step 2
Make sure your grade dependencies section looks like this:
dependencies {

    //Make sure these match
    implementation("androidx.core:core-ktx:1.9.0")
    implementation("androidx.appcompat:appcompat:1.6.1")
    implementation("com.google.android.material:material:1.9.0")
    implementation("androidx.constraintlayout:constraintlayout:2.1.4")
    testImplementation("junit:junit:4.13.2")
    androidTestImplementation("androidx.test.ext:junit:1.1.5")
    androidTestImplementation("androidx.test.espresso:espresso-core:3.5.1")
}
Step 3
Create a new Kotlin class named MyCanvas and add the code below. Be sure to read the comments thoroughly. Don’t forget to add the imports as needed.
/**
 * This custom class extends View and manages drawing paths on the screen.
 * It is used by MainActivity, and is the main UI for the app.
 */
class MyCanvas @JvmOverloads constructor(
    context: Context,
    attrs: AttributeSet? = null,
    defStyle: Int = 0
) : View(context, attrs, defStyle) {

    //Set up some vars used in the class
    //stroke thickness defined in the Paint object
    val strokeWidthMedium = 10f

    // this is where we map finger ID (Int) to Path (the line drawn on screen)
    var activePaths: HashMap<Int, Path> = HashMap()

    //setting up the Paint object. Notice the use of Kotlin's '.apply{}' syntax
    var pathPaint = Paint(Paint.ANTI_ALIAS_FLAG).apply {
        color = Color.BLACK
        style = Paint.Style.STROKE
        strokeWidth = strokeWidthMedium
    }

    /**
     *
     */
    override fun onDraw(canvas: Canvas?) {
        super.onDraw(canvas)

        //drawing 'paths' from the set of active paths
        for (path in activePaths.values) {
            canvas?.drawPath(path, pathPaint)
        }
    }

    /**
     * This function is called by TouchHandler when a new finger is detected on the screen.
     * It adds a new path to the set of active paths.
     */
    fun addPath(id: Int, x: Float, y: Float) {
        val path = Path()
        path.moveTo(x, y)
        activePaths[id] = path

        //Forces the canvas to redraw
        invalidate()
    }

    /**
     * This function is called by TouchHandler when a finger is moved on the screen.
     * It updates the path corresponding to the finger ID.
     * Notice the use of .lineTo(x,y)
     */
    fun updatePath(id: Int, x: Float, y: Float) {
        val path = activePaths[id]
        path?.lineTo(x, y)
        invalidate()
    }

    /**
     * This function is called by TouchHandler when a finger is lifted from the screen.
     * It removes the path corresponding to the finger ID.
     */
    fun removePath(id: Int) {
        if (activePaths.containsKey(id)) {
            activePaths.remove(id)
            invalidate()
        }
    }
}
Step 4
Put the custom View (MyCanvas) into a Framelayout so that it is full screen. Add the following to activity_main.xml:
<?xml version="1.0" encoding="utf-8"?>
<FrameLayout
       android:layout_width="match_parent"
       android:layout_height="match_parent"
       xmlns:android="http://schemas.android.com/apk/res/android">


   <edu.vt.cs3714.tutorial07.MyCanvas
           android:layout_width="match_parent"
           android:layout_height="match_parent" android:id="@+id/myCanvas"/>
</FrameLayout>
Step 5
We need a way to handle touch events. To do this, we will create a separate class called TouchHandler:
class TouchHandler(var mainActivity: MainActivity) : View.OnTouchListener {

    //we will need to this to interpret onLongPress and onDoubleTap
    var gestureDetectorCompat: GestureDetectorCompat =
        GestureDetectorCompat(this.mainActivity, MyGestureListener(mainActivity))

    //Handle the onTouch event
    @SuppressLint("ClickableViewAccessibility")
    override fun onTouch(v: View, event: MotionEvent): Boolean {
        val maskedAction = event.actionMasked
        gestureDetectorCompat.onTouchEvent(event)
        when (maskedAction) {
            //Start drawing a new line (path)
            MotionEvent.ACTION_DOWN, MotionEvent.ACTION_POINTER_DOWN -> {
                var i = 0
                //number of points
                val size = event.pointerCount
                while (i < size) {
                    //finger ID
                    val id = event.getPointerId(i)
                    //updating path: MainActivity->MyView->(invalidate)->XML-> your eyes
                    mainActivity.addNewPath(id, event.getX(i), event.getY(i))
                    i++
                }

            }
            //Continuing drawing the path as the finger moves
            MotionEvent.ACTION_MOVE -> {
                var i = 0
                val size = event.pointerCount
                while (i < size) {
                    val id = event.getPointerId(i)
                    mainActivity.updatePath(id, event.getX(i), event.getY(i))
                    i++
                }
            }
            //Remove the path the finger creates when the finger is lifted.
            MotionEvent.ACTION_UP, MotionEvent.ACTION_POINTER_UP, MotionEvent.ACTION_CANCEL -> {
                var i = 0
                val size = event.pointerCount
                while (i < size) {
                    val id = event.getPointerId(i)
                    mainActivity.removePath(id)
                    i++
                }
            }
        }

            return true
    }

    /**
     * inner class definition for the gesture listener that will
     * help us interpret onDoubleTap and onLongPress
     *
     * @property mainActivity
     */
     private class MyGestureListener(var mainActivity: MainActivity) : GestureDetector.SimpleOnGestureListener() {
        override fun onDoubleTap(e: MotionEvent): Boolean {
           //passing it to Activity
           mainActivity.onDoubleTap()
           return super.onDoubleTap(e)
        }

        override fun onLongPress(e: MotionEvent) {
           //passing it to Activity
           mainActivity.onLongPress()
           super.onLongPress(e)
        }
    }
}
Step 6
Go to MainActivity and connect all of the pieces together. Read the comments to understand how we put everything together.
class MainActivity : AppCompatActivity() {
    // an instance of MyCanvas
    lateinit var myCanvas: MyCanvas

    //an instance of TouchHandler that will be set-up to listen to touch events from within MyCanvas.
    lateinit var touchHandler: TouchHandler
    override fun onCreate(savedInstanceState: Bundle?) {
        super.onCreate(savedInstanceState)
        setContentView(R.layout.activity_main)
        //linking with the XML
        myCanvas = findViewById<MyCanvas>(R.id.myCanvas)
        //instantiating a TouchHandler instance. Notice that we are passing a MainActivity instance.
        touchHandler = TouchHandler(this)
        myCanvas.setOnTouchListener(touchHandler)
    }

    //touchandler-> this function relays it to -> myCanvas
    //You can also allow touchHandler to update myCanvas directly
    // (this will require passing myCanvas to touchHandler).
    fun addNewPath(id: Int, x: Float, y: Float) {
        myCanvas.addPath(id, x, y)
    }

    fun updatePath(id: Int, x: Float, y: Float) {
        myCanvas.updatePath(id, x, y)
    }

    fun removePath(id: Int) {
        myCanvas.removePath(id)
    }

    /**
     * This function is called by TouchHandler when a doubleTap is detected.
     * It changes the background color of the canvas.
     */
    fun onDoubleTap() {
        //double tapping changes the background to a random color
        myCanvas.setBackgroundColor(
            Color.rgb(
                (0..255).random(), (0..255).random(),
                (0..255).random()
            )
        )
    }

    /**
     * This function is called by TouchHandler when a longPress is detected.
     * It activates the camera Intent
     */
    fun onLongPress() {
        //takes a picture and chnages the background to it
        dispatchTakePictureIntent()
    }

    /**
     * adapted from https://developer.android.com/training/camera/camera-intents
     */

    lateinit var currentPhotoPath: String

    @Throws(IOException::class)
    /**
     * This function creates a file to store the image taken by the camera.
     */
    private fun createImageFile(): File {
        // Create an image file name. Adding the date and time to the file name
        // ensures that the file name is unique.
        val timeStamp: String = SimpleDateFormat("yyyyMMdd_HHmmss", Locale.US).format(Date())
        // Get a handle to the file in the file system
        val storageDir: File? = getExternalFilesDir(Environment.DIRECTORY_PICTURES)

        // Create a file to store the image with the name "JPEG_<date>_<time>.jpg"
        return File.createTempFile(
            "JPEG_${timeStamp}_", /* prefix */
            ".jpg", /* suffix */
            storageDir /* directory */
        ).apply {
            // Save a file path for use with ACTION_VIEW intents
            currentPhotoPath = absolutePath
            // Lets look at the path that was created
            Log.i("T07", currentPhotoPath)
        }
    }


    /**
     * adapted from https://developer.android.com/training/camera/camera-intents
     */
    val REQUEST_TAKE_PHOTO = 1

    lateinit var photoURI: Uri
    private fun dispatchTakePictureIntent() {
        // Create an implicit intent to take a picture and return control to the calling application
        Intent(MediaStore.ACTION_IMAGE_CAPTURE).also { takePictureIntent ->
            // Ensure that there's a camera activity to handle the intent
            takePictureIntent.resolveActivity(packageManager)?.also {
                // Create the File where the photo should go
                val photoFile: File? = try {
                    createImageFile()
                } catch (ex: IOException) {
                    Log.e("Picture Intent", "Error creating file")
                    null
                }
                // Continue only if the File was successfully created
                photoFile?.also {
                    photoURI = FileProvider.getUriForFile(
                        this,
                        "edu.vt.cs3714.tutorial07.fileprovider",
                        it
                    )
                    takePictureIntent.putExtra(MediaStore.EXTRA_OUTPUT, photoURI)
                    startActivityForResult(takePictureIntent, REQUEST_TAKE_PHOTO)
                }
            }
        }
    }

    /**
     * adapted from https://developer.android.com/training/camera/camera-intents
     */
    override fun onActivityResult(requestCode: Int, resultCode: Int, data: Intent?) {
        super.onActivityResult(requestCode, resultCode, data)

        if (requestCode == REQUEST_TAKE_PHOTO && resultCode == Activity.RESULT_OK) {
            this.contentResolver.notifyChange(photoURI, null)
            val cr = this.contentResolver
            Log.i("T07", photoURI.toString())
            Log.d("T07", "intent result ok")
            try {
                val bitmap = MediaStore.Images.Media.getBitmap(cr, photoURI)
                myCanvas.background = BitmapDrawable(resources, bitmap)
            } catch (e: IOException) {
                Log.d("test", "activity result error")
                e.printStackTrace()
            }

        }
    }
}
Step 7
Run the app and make sure the touch features work. Also try double-tapping and long-pressing the canvas. In order to emulate multi-touch (if you are not using a physical phone) press ‘ctrl’ and then right-click.
