Class Tutorial 01 : GUI
Before you get started:
Make sure to have completed:
- Getting familiar with Kotlin (with solutions)
- How to setup Android Studio: Android fundamentals 01.1: Android Studio and Hello World
- How to create your first Kotlin app
Step-By-Step
Step 0
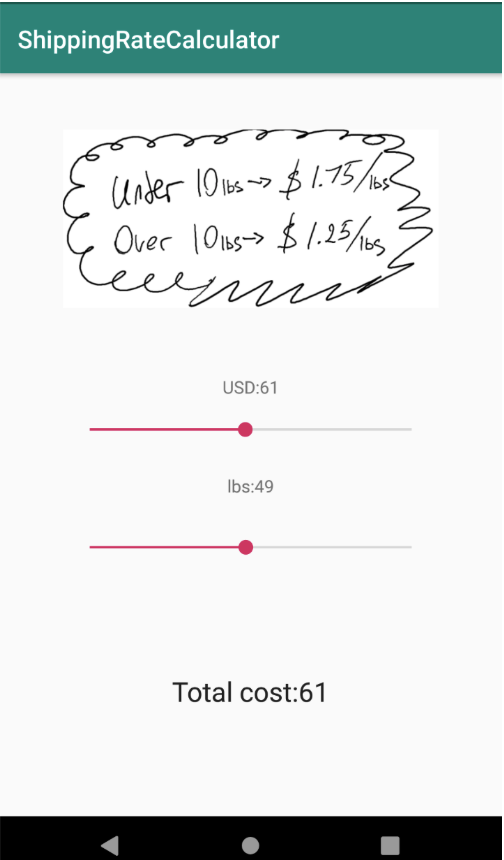
Start by looking at the snapshot of the UI:

In order to replicate this style UI you will need to create a layout that contains the following:
ImageViewto display the image,TextViewto show the price in USDSeekBarto input moneyTextViewto display the amount the can shipped for a given amount of moneySeekBarto input the weight of the packageTextViewto show total cost
Step 1
Create a new Empty Views Activity project in Android Studio
Download the pricing.png image file, then copy it to the res/drawable folder before proceeding to the next action.
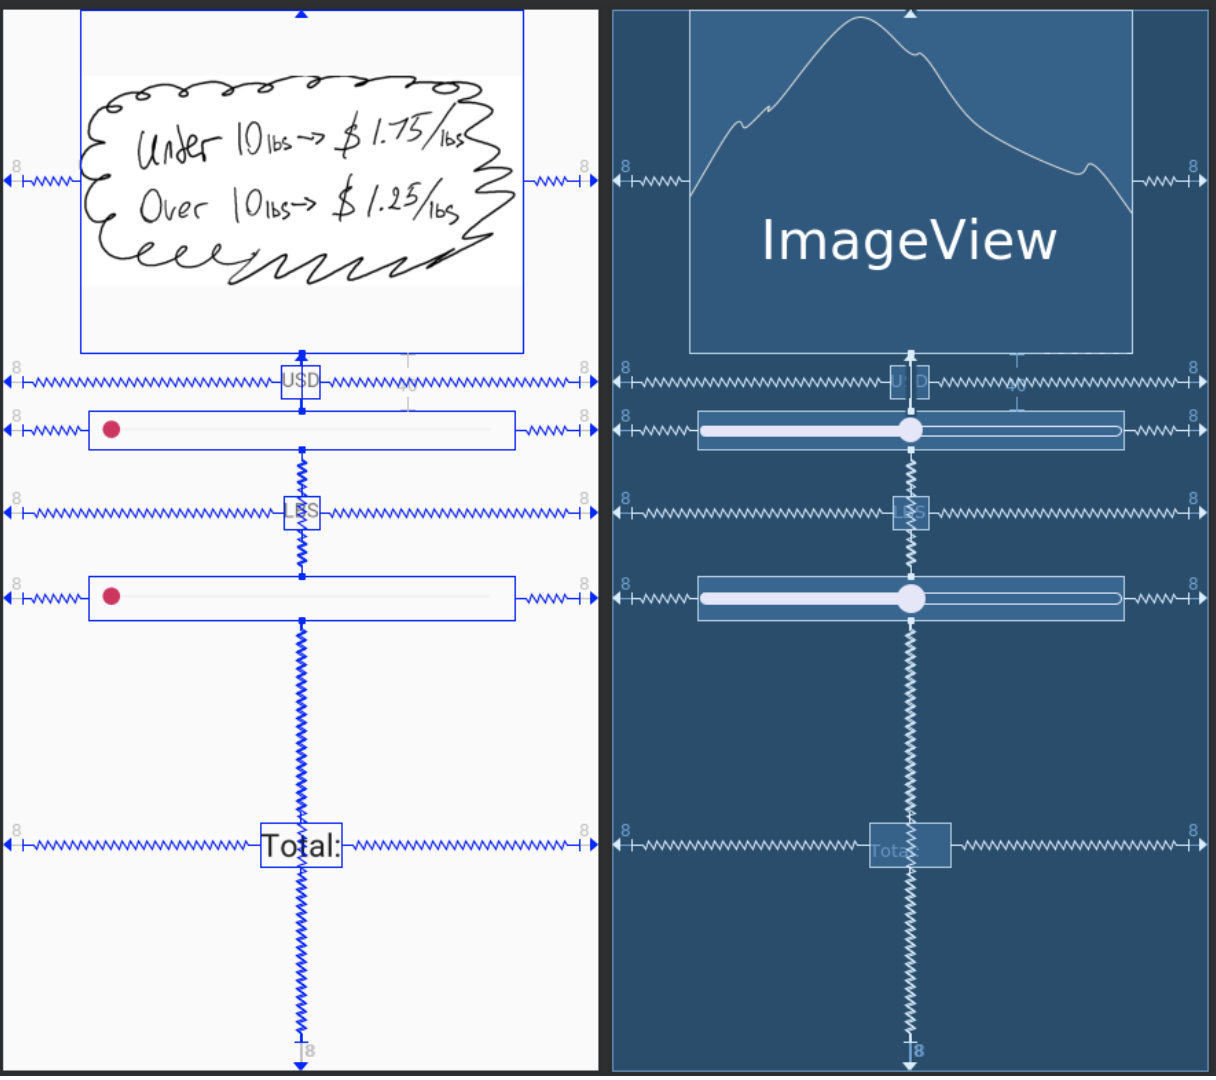
Then, navigate to res/layout/activity_main.xml and create a layout that resembles the following:

<?xml version="1.0" encoding="utf-8"?>
<androidx.constraintlayout.widget.ConstraintLayout xmlns:android="http://schemas.android.com/apk/res/android"
    xmlns:app="http://schemas.android.com/apk/res-auto"
    xmlns:tools="http://schemas.android.com/tools"
    android:layout_width="match_parent"
    android:layout_height="match_parent"
    tools:context=".MainActivity">

    <androidx.appcompat.widget.Toolbar
        android:id="@+id/toolbar"
        android:layout_width="match_parent"
        android:layout_height="?attr/actionBarSize"
        android:layout_marginTop="4dp"
        android:background="?attr/colorPrimary"
        android:elevation="4dp"
        android:theme="@style/ThemeOverlay.AppCompat.ActionBar"
        app:layout_constraintEnd_toEndOf="parent"
        app:layout_constraintHorizontal_bias="0.0"
        app:layout_constraintStart_toStartOf="parent"
        app:layout_constraintTop_toTopOf="parent"
        app:popupTheme="@style/ThemeOverlay.AppCompat.Light" />

    <ImageView
        android:id="@+id/imageView"
        android:layout_width="306dp"
        android:layout_height="236dp"
        android:layout_marginTop="28dp"
        android:contentDescription="pricing"
        app:layout_constraintEnd_toEndOf="parent"
        app:layout_constraintHorizontal_bias="0.495"
        app:layout_constraintStart_toStartOf="parent"
        app:layout_constraintTop_toBottomOf="@+id/toolbar"
        app:srcCompat="@drawable/pricing" />

    <TextView
        android:id="@+id/lbs_total"
        android:layout_width="wrap_content"
        android:layout_height="23dp"
        android:layout_marginStart="8dp"
        android:layout_marginEnd="8dp"
        android:text="@string/lbs_label"
        app:layout_constraintBottom_toTopOf="@+id/lbs_seek_bar"
        app:layout_constraintEnd_toEndOf="parent"
        app:layout_constraintHorizontal_bias="0.498"
        app:layout_constraintStart_toStartOf="parent"
        app:layout_constraintTop_toBottomOf="@+id/usd_seek_bar"
        app:layout_constraintVertical_bias="0.573" />

    <SeekBar
        android:id="@+id/usd_seek_bar"
        android:layout_width="294dp"
        android:layout_height="27dp"
        android:layout_marginStart="8dp"
        android:layout_marginTop="32dp"
        android:layout_marginEnd="8dp"
        app:layout_constraintEnd_toEndOf="parent"
        app:layout_constraintHorizontal_bias="0.495"
        app:layout_constraintStart_toStartOf="parent"
        app:layout_constraintTop_toBottomOf="@+id/imageView" />

    <SeekBar
        android:id="@+id/lbs_seek_bar"
        android:layout_width="294dp"
        android:layout_height="30dp"
        android:layout_marginStart="8dp"
        android:layout_marginTop="32dp"
        android:layout_marginEnd="8dp"
        android:layout_marginBottom="8dp"
        app:layout_constraintBottom_toBottomOf="parent"
        app:layout_constraintEnd_toEndOf="parent"
        app:layout_constraintHorizontal_bias="0.495"
        app:layout_constraintStart_toStartOf="parent"
        app:layout_constraintTop_toBottomOf="@+id/usd_seek_bar"
        app:layout_constraintVertical_bias="0.218" />

    <TextView
        android:id="@+id/usd_total"
        android:layout_width="wrap_content"
        android:layout_height="23dp"
        android:layout_marginStart="8dp"
        android:layout_marginEnd="8dp"
        android:text="@string/usd_label"
        app:layout_constraintBottom_toTopOf="@+id/usd_seek_bar"
        app:layout_constraintEnd_toEndOf="parent"
        app:layout_constraintHorizontal_bias="0.498"
        app:layout_constraintStart_toStartOf="parent"
        app:layout_constraintTop_toBottomOf="@+id/imageView"
        app:layout_constraintVertical_bias="1.0" />

    <TextView
        android:id="@+id/total"
        android:layout_width="wrap_content"
        android:layout_height="wrap_content"
        android:layout_marginStart="8dp"
        android:layout_marginTop="8dp"
        android:layout_marginEnd="8dp"
        android:layout_marginBottom="8dp"
        android:text="@string/total_label"
        android:textAppearance="@android:style/TextAppearance.DeviceDefault.Large"
        app:layout_constraintBottom_toBottomOf="parent"
        app:layout_constraintEnd_toEndOf="parent"
        app:layout_constraintHorizontal_bias="0.498"
        app:layout_constraintStart_toStartOf="parent"
        app:layout_constraintTop_toBottomOf="@+id/lbs_seek_bar"
        app:layout_constraintVertical_bias="0.671" />

</androidx.constraintlayout.widget.ConstraintLayout>
Step 2
Once finished with the previous step, you should see errors related to missing string resources (‘@string/…’). You could just hardcode the strings without referring to the resource file but it is considered to be a bad practice (high coupling). To fix this go to res/values/strings.xml and add the following to the list of resources:
    <string name="usd_label">USD:</string>
    <string name="lbs_label">LBS:</string>
    <string name="total_label">TOTAL:</string>
Step 3
Let’s switch to Kotlin – open MainActivity and create variables for the two seekbar and the textviews. Do not create a variable for the textview that contains the total. We will access it differently in a later step.
Before we can use components, we may have to import them. Make sure that these import statements are at the top ofMainActivity.kt:
import android.widget.SeekBar
import android.widget.TextView
import androidx.appcompat.widget.Toolbar
Declare the controls as class variables in MainActivity like this:
var usdSeekBar:SeekBar? = null
var lbsSeekBar:SeekBar?= null
var usdTotal:TextView?= null
var lbsTotal:TextView?= null
and initialize inside onCreate():
usdSeekBar = findViewById(R.id.usd_seek_bar)
lbsSeekBar = findViewById(R.id.lbs_seek_bar)
usdTotal =   findViewById(R.id.usd_total)
lbsTotal =   findViewById(R.id.lbs_total)
Finally, initialize the toolbar.
//This makes the toolbar show up.
val toolbar: Toolbar = findViewById<View>(R.id.toolbar) as Toolbar

// Make sure the toolbar exists in the activity and is not null
setSupportActionBar(toolbar)
Step 4
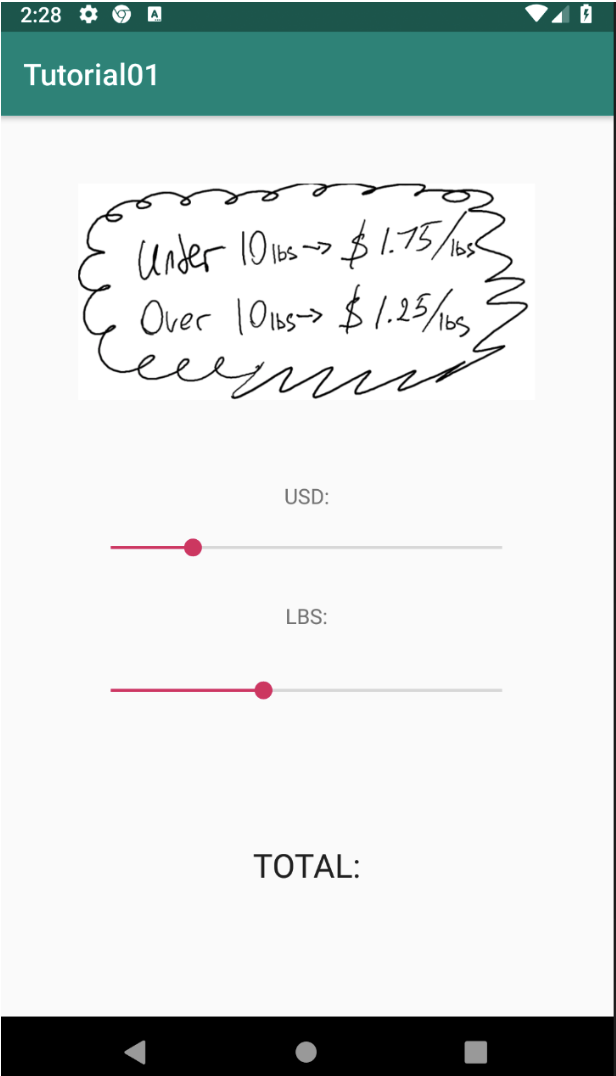
Run the project. In Android Studio, go the the Run menu and select Run app.. Make sure you get something like this:

Step 5
Next we need to define the range for the seekbars. We will only allow the customers to ship up to 100 pounds thus the maximum cost is going to be $1.25 * 100 pounds = $125. With Android API 26 and above it can be accomplished via the min/max properties of SeekBar.
Create a helper method in MainActivity.kt:
private fun setBoundaries(){
   usdSeekBar?.min = 1
   usdSeekBar?.max = 125
   lbsSeekBar?.min = 1
   lbsSeekBar?.max = 100
}
then call it from onCreate(), after the initialized handles to the seekbars:
setBoundaries()
Step 6
In this step we will add some interactivity. In order to track interactions with the seekbar you need to add a listener object and capture change events. Inside onCreate() add the following (be sure to read the comments):
      usdSeekBar?.setOnSeekBarChangeListener(object: SeekBar.OnSeekBarChangeListener{
           override fun onProgressChanged(seekBar: SeekBar?, progress: Int, fromUser: Boolean) {
               //progress changed
               //updating textview
               //notice the use of ‘$’. What do you think it does?
               usdTotal?.text = "USD:$progress"

               //directly accessing the textview without using kotlin variables
               //notice the use ‘+’ for concatenating an int with a string (java style)
               findViewById<TextView>(R.id.total).text = "Total cost:"+progress
           }

           //required method
           override fun onStartTrackingTouch(seekBar: SeekBar?) {
           }
           //required method
           override fun onStopTrackingTouch(seekBar: SeekBar?) {
           }
       })
Step 7
Run the app and make sure the functional seekbar updates textview values.
If you don’t see the values change, make sure that the call to setContentView(R.layout.activity_main) in onCreate() is called before the code you added.
Step 8
Now you will connect the two seekbars by converting the USD amount to an equivalent shipment weight and updating the bottom seekbar. You can choose to do the update when the finger is lifted from the seekbar knob. To implement this functionality add a variable to capture the usd amount and then inside onStopTrackingTouch convert the USD amount into equivalent Lbs number. You will also need to add an import: import java.lang.Math.round:
usdSeekBar?.setOnSeekBarChangeListener(object: SeekBar.OnSeekBarChangeListener{

   var usd_sync=0

   override fun onProgressChanged(seekBar: SeekBar?, progress: Int, fromUser: Boolean) {
       //progress changed
       usdTotal?.text = "USD:$progress"
       usd_sync=progress

       findViewById<TextView>(R.id.total).text = "Total cost:"+progress
   }

   override fun onStartTrackingTouch(seekBar: SeekBar?) {
      //when change starts
   }

   override fun onStopTrackingTouch(seekBar: SeekBar?) {
       // notice the logic for determining which price to apply
       if(usd_sync.toFloat()<10/1.75)
           lbsSeekBar?.progress = round(usd_sync/1.75f)
       else
           lbsSeekBar?.progress = round(usd_sync/1.25f)
   }
})
Occasionally, if you use a method for the first time, you may see the method highlighted in red, the call to round(). If you mouse over the unknown method, you will set some context-sensitive help:

Select ‘Import function’, and android studio will automatically add an import statement to the top of the file:
import java.lang.Math.roundSince the same method name can be used in multiple classes, you may multiple classes to choose to import from:

Use the names of the source classes to help you decide. This is a math function, so we will pick java.lang.Math.round
Step 9
Run the app and make sure that the values are updated and displayed correctly.
Step 10
In this final step you will add a listener to the LBS seekbar listener and connect the values with the USD seekbar. Add the following inside `onCreate()``:
lbsSeekBar?.setOnSeekBarChangeListener(object: SeekBar.OnSeekBarChangeListener{

   var lbs_sync=0

   override fun onProgressChanged(seekBar: SeekBar?, progress: Int, fromUser: Boolean) {
       //progress changed

       lbsTotal?.text = "lbs:$progress"
       lbs_sync=progress
   }

   override fun onStartTrackingTouch(seekBar: SeekBar?) {

   }

   override fun onStopTrackingTouch(seekBar: SeekBar?) {
       if (lbs_sync < 10){
           usdSeekBar?.progress = round(lbs_sync * 1.75f)
       } else {
           usdSeekBar?.progress = round(lbs_sync * 1.25f)
       }
   }
})
Step 11
Bonus Add a currency selector that will allow the user to switch from USD to Bitcoin.
Step 12
Bonus Replace the findViewById’s by more modern view binding technique