
The concept of blending images is relatively easy. We know that in order to copy an image we simply transfer each source pixel's RGB values into a pixel in a target image. If we simply replace the pixels of the target then the result is a pasting of the source image into the target. Let us begin by accomplishing this image pasting. The year 2012 was the seventieth anniversary of the classic film Casablanca. The following two images are of the star crossed lovers of the movie, Humphrey Bogart and Ingrid Bergman.

As a tribute to the film we will work with these images. Let us start by pasting the image of Ms. Bergman into Mr. Bogart's picture. We will paste her image aligned at the origin of the Bogey image. Pasting is a straightforward application of the copying we have already learned. It is accomplished by using the Bergman image as the source and the Bogart image as the target. It simply requires looping over the pixels of the source and using their RGB values as replacement values for the corresponding pixel in the target. (Of course the target image should be larger than the source.) The following program achieves the desired effect.
Executing the program on the images above results in the following pasted collage.

A much better effect would be combine the images to give the impression that
Bogart's character, Rick, is thinking about Bergman's character, Ilsa. This
requires blending the images together. When blending images the necessary step
required is to combine the colors of corresponding pixels of the images together. The RGB
values of the pixels to be blended are added together using a percentage of the
color of each pixel. If even blending is desired then 50% of each RGB
value of the source pixels is added to 50% of each RGB
value of the target pixels to make the color of the blended pixel. In the
Bergman/Bogart merging above we do not wish an even blending instead we will use
33% of the Bergman pixel color and 67% of the Bogart pixel color. You should now
be able to write a blend33() function to perform this blending. To view the completed function move your mouse over the following
paragraph.
|
|
Once you have completed the function replace the paste function in the
program above and modify the main() driver to execute your code. If you have
implemented it correctly you should be able to produce the following blended
image.

Since both images are grayscale we are actually blending grayscale pixels which of course results in grayscale pixels. The process is the same for color images. To generalize the above blending function it would be best to pass a third parameter which indicates the percentage of the desired blending of the source. In this case the blending of the target would become 1.0 - (source blending).
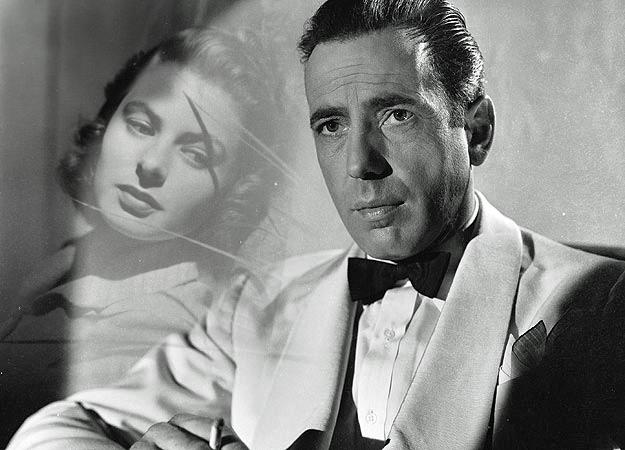
A smoother blending can be achieved by changing the percentage of the blending as the blending is taking place. For the above images, the further along the x-axis the blending proceeds it would be better to use less of the source, (i.e. Bergman), image and more of the target, (i.e. Bogart), image. Of course the same decreased blending from the source should also occur the farther down the y-axis the blending proceeds. One easy technique to accomplish this is linear interpolation, (see the Nearest Neighbor scaling notes). As the blending traverses along the x-axis, the current column coordinate, x, can be divided by the source width. This results in a changing percentage that starts at 0.0 and gradually increases ending at almost 1.0. If we multiply the blending percentage by this changing percentage we can compute how much to decrease the blending percentage by in order to achieve a horizontal gradient blend. Performing the same computations down the y-axis results in a second vertical blending gradient decrease. Of course applying both the horizontal and vertical blending decrease would result in too much of a blending reduction. The simple solution is to choose the larger of the two reductions to use at any given pixel.
To take this programming challenge go ahead and attempt to code this gradient blend function before moving your mouse over the following paragraph to view the completed function.
|
|
An application of the above function with a blending of 0.90 is shown below.
© N. Dwight Barnette 2012
Virginia Tech University, All right reserved.
|